
Bush Tucker: Lilly Pilly Jam Recipe
As part of my passion for landscape design and garden design, I love edible landscapes. Whether it’s an herb garden right outside the kitchen, a fruit and veggie patch in your backyard or wild berries found on an afternoon walk, food is one of the surest ways to understand the usefulness of the land around you.
My family has a long tradition of making jellies, jams, pickles and preserves. Watching a bumper crop getting close to harvest meant planning what we were going to eat and what we were going to preserve for later. This summer has been perfect for lilly pilly berries and at the moment, lilly berry trees and shrubs are bursting with the small, tart fruits- so it’s time to look at a recipe for using this wonderful and plentiful source of bush tucker!
I hate trying to read a recipe online and I have to scroll through 10,000 words about that time the food blogger’s great-great-grandmother gave Napolean’s second cousin (twice-removed) some peach cobbler and so he saved their village from being razed, and that village was where the very first labradoodle was bred etc. etc. etc.
I am in no way a food blogger, so to skip all that, here’s the recipe for Lilly Pilly Jam-
Finding Lilly Pilly Fruit
But first, an important word of caution: I think it definitely needs to be said before you go out and start collecting lilly pilly berries or undertake any kind of foraging that you don’t pick or eat anything you aren’t absolutely sure of what it is. Just because you see a pink berry on a bush doesn’t mean it’s a lilly pilly -there are lots of poisonous berries the same colour that are also around. I’ve provided a reference picture of lilly pilly fruit and flowers below. The fruits themselves are approximately 10-15mm long and when ripe range from a bright magenta to deep crimson colour. When ripe, their taste is tart, with the slightest hint of spice like cinnamon, clove or allspice. Lilly pilly trees, hedges and shrubs that have not been clipped will have had a chance to fruit and flower. In late summer, the berries can be found in abundance and it would only take 10 minutes of easy picking to collect 8 cups of the fruit.
Something else that’s important to consider: make sure you know how the lilly pilly plant you are picking from has been cared for- in other words make sure that you’re not picking berries off of a bush that has been treated with potentially dangerous chemicals such as pesticides or herbicides. Wash thoroughly anything you forage.
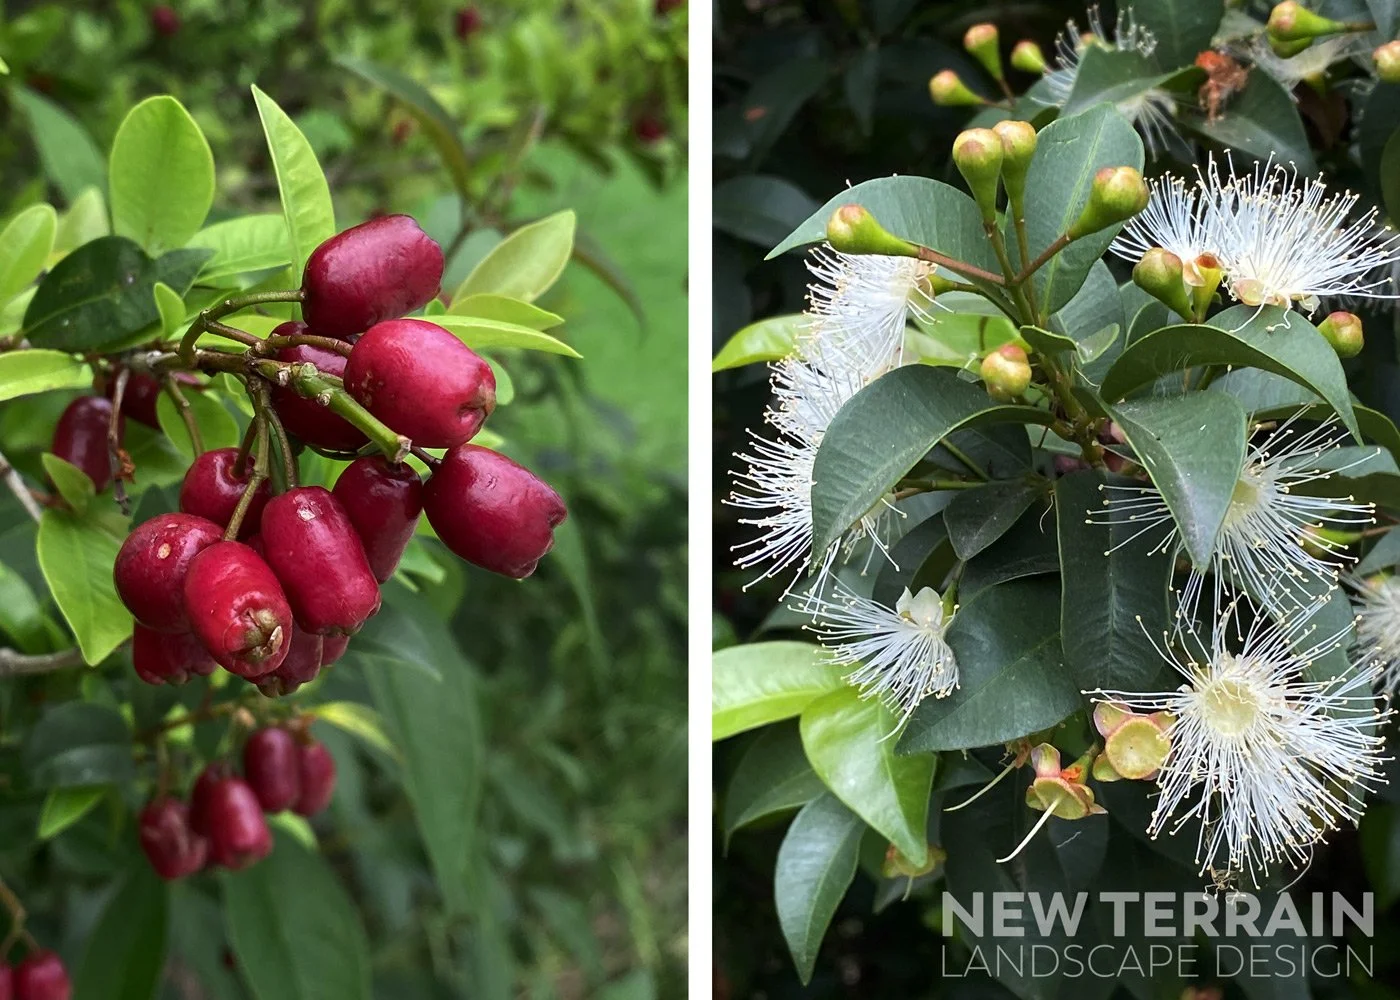
Ripe berries and flowers of the Australian native Lilly Pilly, (AKA Lilli Pilli or Syzigium Smithii / Acmena Smithii)
The Recipe: Lilly Pilly Jam
Time required: Approximately 1.5 hours of cooking time as well as a few hours of straining the fruit through a cheesecloth for juice extraction.
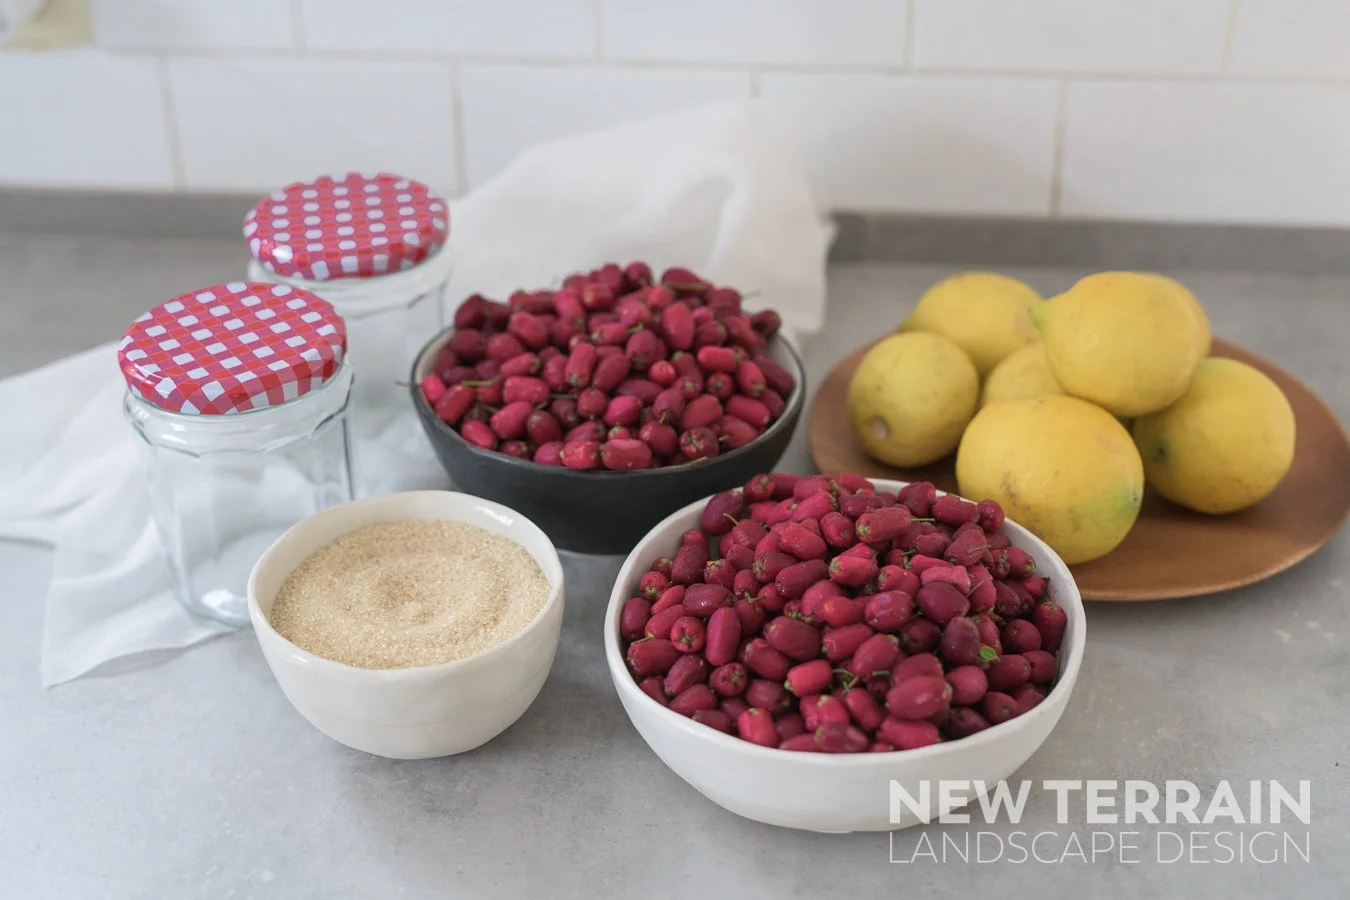
The recipe is quite simple. You need lilly pilly berries, fresh lemons, sugar, cheese cloth and sterilised jars.
Ingredients
I’ve come across a number of recipes for Lilly Pilly jam and most of them seem to be a bit vague about actual measurements and yields.
This recipe yields 2 jars (375ml each) of jam.
8 Cups Lilli Pilli Berries
2.5 Cups of Sugar
3 Lemons
-The recipe is easily scaled by proportions: 1 Cup of lilly pilly berry juice requires 1 cup of sugar and the juice of 1 lemon.
-No pectin is required as the berries have enough pectin in them for the jam to set.
Instructions
Step 1: Wash the berries
Wash all of the fruit thoroughly, taking care to remove any under ripe berries, stems or leaves.

Wash the lilly pilly berries, being careful to remove any leaves, stems and over ripe berries from the boil.
Step 2: Boil the berries
Put the berries in a pot and put just enough water in the pot to cover the berries. It may be difficult to gauge how much water will cover the berries because they float so I weigh the berries down with a plate or pot lid when adding the water. Bring the pot with berries to a boil and allow the pot to boil for an hour. You’ll notice that they’ll lose most of their colour and will change to a pale mauve colour.
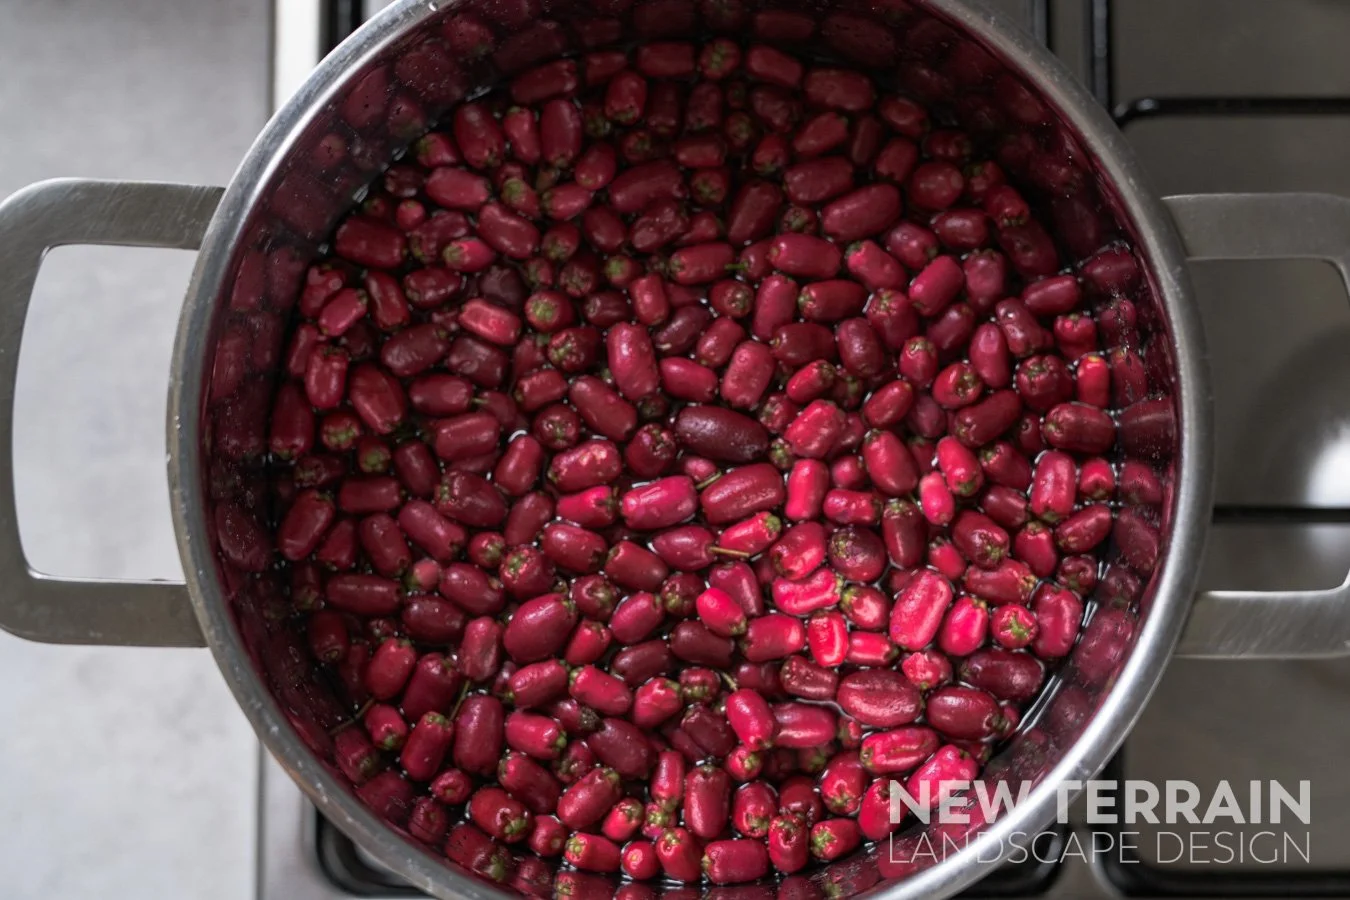
Add just enough water to the lilly pilly berries to cover them for boiling.

Boiling the lilly pilly berries to extract the juice.
Step 3: Strain juice from the berries
Place a large, clean cheesecloth into a large bowl and then pour the contents of the pot into the bowl. Lift up the cheesecloth and close it with some twine or string and hang the bag of berries over the bowl, allowing all the juices to drain. Over several hours the juices from the berries will completely drain into the bowl. You can lightly squeeze the berries to allow any remaining juice to drip down but squeezing them too hard might add pulp from the berries to the juice which can make it cloudy. If I’m making the juice in the afternoon I will allow the bag to drain overnight and then make the jam the next day, otherwise I’ll refrigerate it or freeze it until I’m ready to make the jam.

Pour the berries and juice into a bowl lined with cheesecloth.

Form the cheesecloth into a bag and hang to strain the juices into a bowl.
Step 4: Making the Jam
Measure out the amount of juice that you have produced from the boil and for every 1 cup of juice, add an equal amount of sugar and the juice of 1 lemon. Add the ingredients into a pot and begin to slowly bring the mixture to a boil will mixing, ensuring that all of the sugar dissolves. Skim off and remove any of the foam as it begins to boil.
- This is the part where you can’t walk away from the stove: as the mixture boils, it will boil off some of its water and the appearance of the boiling liquid will change. Usually this process takes around 15-20 minutes or so but what you are really looking for is the boiling liquid to shift from a watery consistency with bubbles rapidly popping towards a thicker, more syrupy consistency where the bubbles slowly roll on top of each other and pop more slowly (this is around the Soft Ball stage for those of you familiar with candy making).

The mixture starts to thicken and the bubbles roll together as it gets closer to being ready to jar.
- As you get to this state, lower the temperature, taking care not to scorch the liquid. Take a teaspoon of the liquid and drop it on a small plate and pop it in the freezer for 5 minutes. When you pull the plate out of the freezer, push on the puddle of jam with your finger. If it creates a wrinkled skin when you push it with your finger, it’s ready to be taken off the heat and put into the sterilised jars. If it doesn’t form a skin, continue boiling for a few more minutes and try again. There’s enough pectin in the fruit that it will want to set naturally.

The when the jam mixture is ready it forms a skin after being in the freezer 5-10 minutes.
Step 5: Jarring / Canning the Jam
-Sterilise the jars, lids and funnel to be used in the canning process. For a guide to sterilising glass jars for preserves, I find the guide on this site pretty easy and useful.
-While the jars are still hot, carefully pour the hot jam mixture into the jars with the funnel and use oven mitts to immediately tighten the warm lids onto the jars. Don’t pour the hot jam mixture into cold jars as you run the risk of breaking the jars.
-Place the jars on a cooling rack and and allow to cool fully before storing. When using glass jars with metal lids, the act of cooling the jar down to room temperature should create a vacuum seal that will prevent contamination. If the lid does not create a seal and the metal lid freely pops, then store the jam in the refrigerator and consume within a month.

Pouring the mixture into sterilised jars.
Enjoying the Lilly Pilly Jam
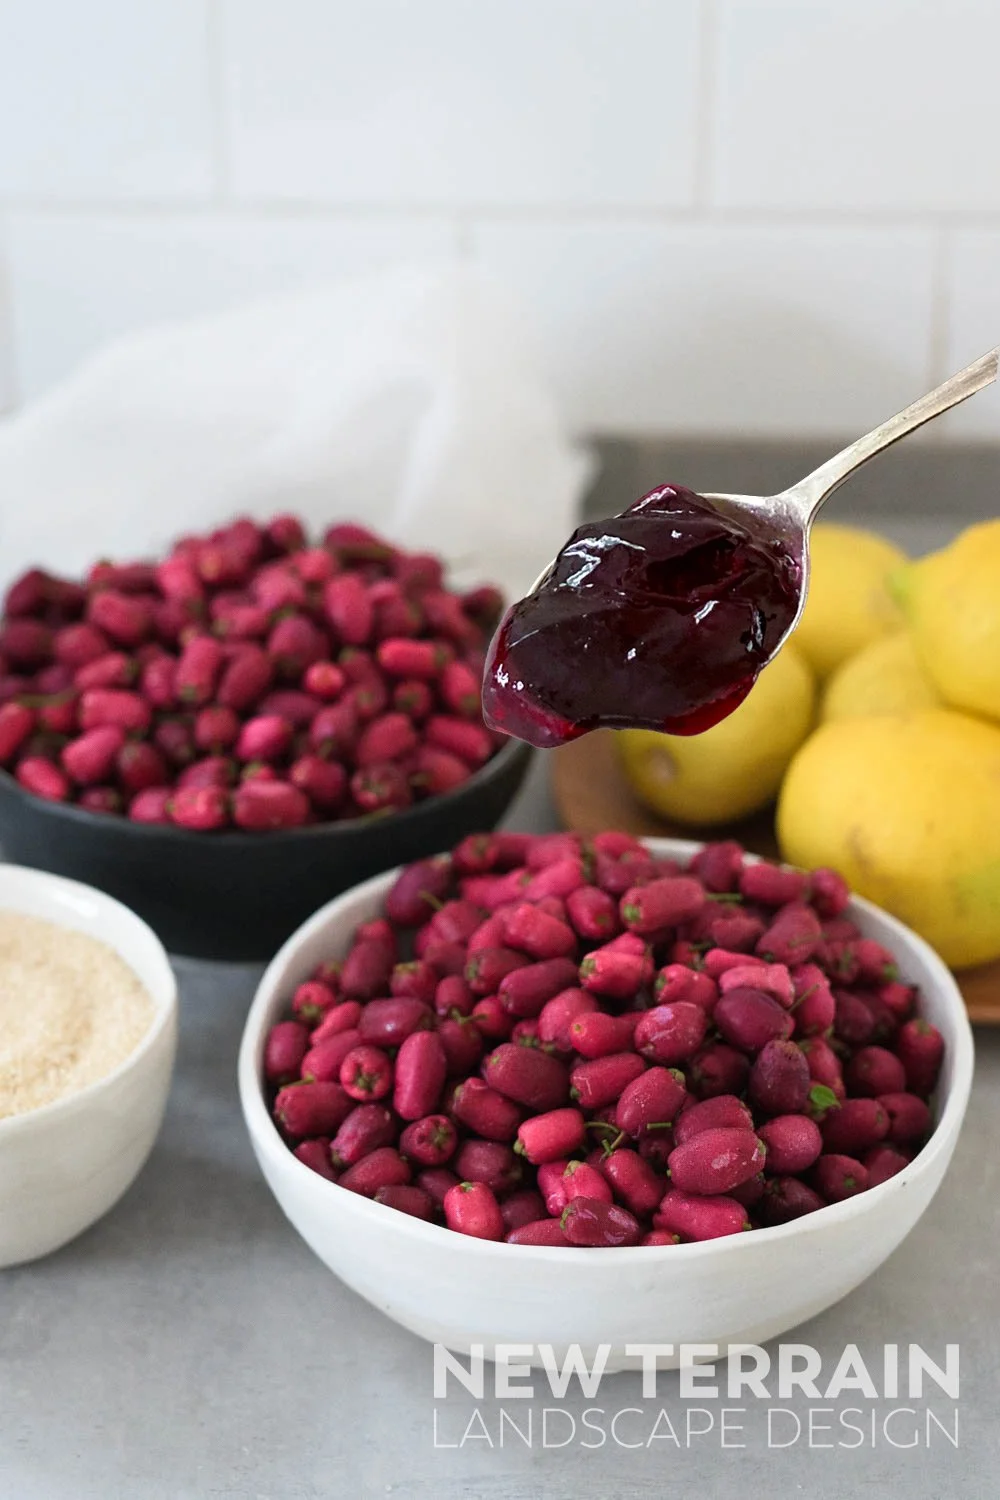
I find that the Lilly Pilly jam has a crisp tartness that reminds me of cranberries or lingonberries (for those of you who have Scandinavian roots, like myself, or have ever had lunch at Ikea). Their tartness goes well with soft cheeses like brie or camembert as well as sharp cheddars and they pair nicely with roast chicken and roast turkey.

Using just lemon, sugar and lilly pilly berries, you can make delicious lilly pilly jam.
About the Lilly Pilly
The fruits, flowers and leaves of the Lilly Pilly
The Lilly Pilly plant- also known as Lilli Pilli or by it’s Latin names Syzigium smithii or Acmena smithii is a native Australian plant that is extensively used in landscape design and garden design in Australia. Its ability to grow rapidly in a wide number of climate conditions, its wide range of growth habits and forms and its ability to respond well to clipping has made it an incredibly useful landscape plant.
While some forms of the lilly pilly can grow to medium sized trees, lilly pillies are most commonly used as shrubs and hedges in landscape design. Varieties such as ‘Goodbye Neighbours’, ‘Backyard Blis’s, ‘Pinnacle’ and ‘Straight and Narrow’ have forms that are ideal for privacy hedging, as they grow quickly, densely and respond well to clipping.
Some forms of lilly pilly such as ‘Cherry Surprise’, ‘Red Head’, ‘Winter Lights’, ‘Firescreen’ and ‘Big Red’ are known for showcasing brilliant red leaves on new growth.
Lilly pillies are subject to pests known as psyllids which can create a damaged, pimple-like surface on affected leaves. Plants seem to be most prone to attack in areas with higher humidity such as the Sydney region, however I’ve seen signs of psyllid attack on lilly pilly shrubs in the Blue Mountains. If you’re in an area where psyllid attack is known to be an issue, there are a number of psyllid resistant varieties available such as ‘Resilience’, ‘Cherry Surprise’ and ‘Allwyns Magic’.
Lilly Pillies are excellent shrub and hedge options for both formal gardens and Australian native gardens and as new varieties are continually being developed, there will be new opportunities to use them in a wide range of garden and landscape settings.
New Terrain Landscape Design can help you with your landscape and garden design.
Contact us now- Let’s work together.